If you navigate to your Nextcloud instance using a browser and go to Administration Settings after a fresh install, you may notice some warnings and recomendations, many of the technologies used on the server side are not optimized for use with Nextcloud out of the box. Any red warnings should be dealt with.
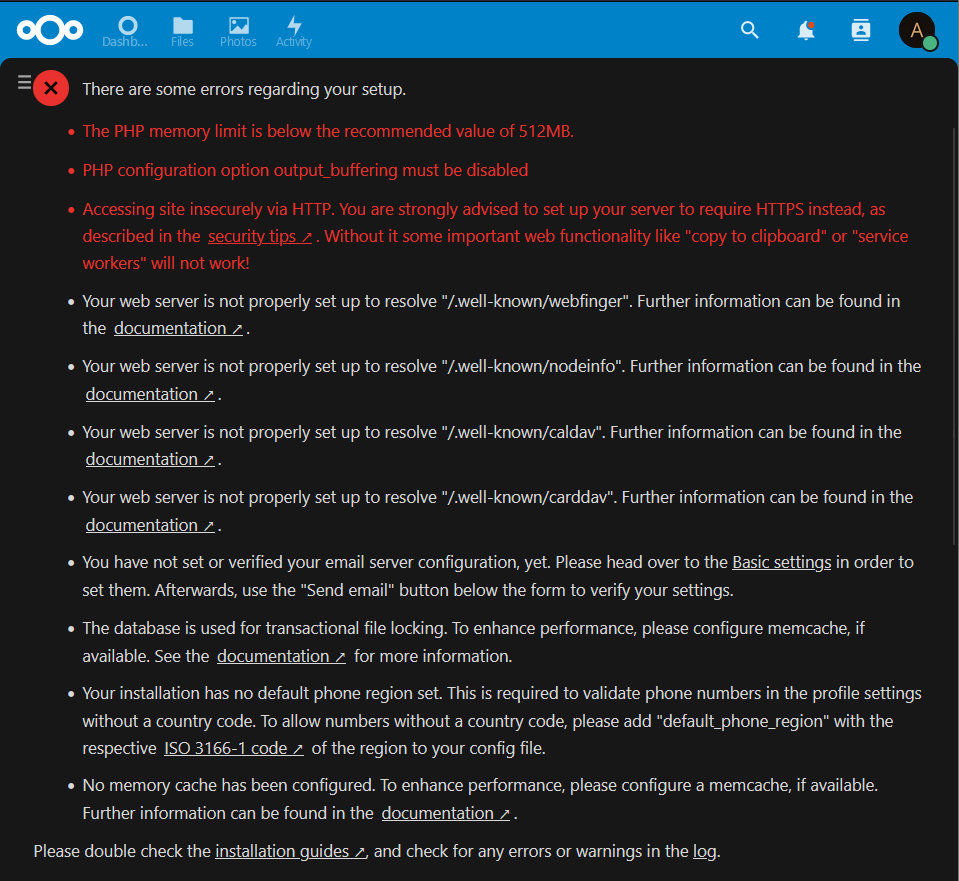
The PHP memory limit is below the recommended value of 512MB:
As seen in the image above, the php memory limit needs to be configured.
A simple way to find information about php is to create a file named phpinfo.php in the root of your web directory, this may be in a different location on your system:
sudo nano /var/www/html/phpinfo.php
Enter the following to phpinfo.php and save:
<?php
phpinfo();
Type the IP of your web server followed by phpinfo.php into a browser to see the loaded configuration file:

Once you find the file it is a good idea to create a backup of it, we will also delete the phpinfo.php file for security.
sudo rm /var/www/html/phpinfo.php
sudo cp /etc/php/8.2/apache2/php.ini /etc/php/8.2/apache2/php.ini.old
edit it with nano
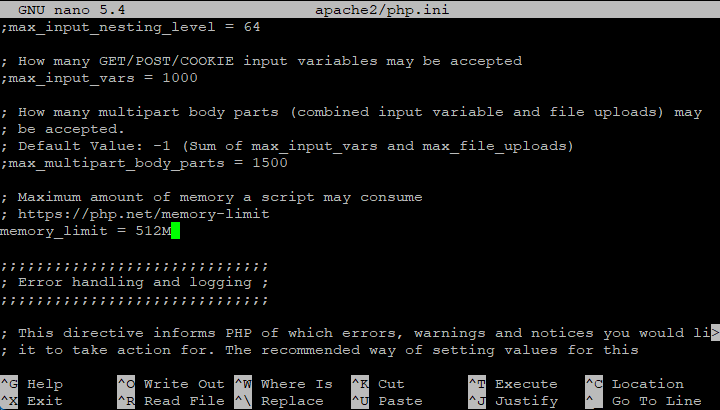
sudo nano /etc/php/8.2/apache2/php.ini
Type ctrl+w to search for memory, here we will update to the recommended 512MB:
Repeat this process for the php.ini file for the cli, this is used by cron jobs:
sudo nano /etc/php/8.2/cli/php.ini
Now restart your web server, for Apache type:
sudo /etc/init.d/apache2 restart
PHP configuration option output_buffering must be disabled:
Here we will disable output buffering using the loaded php.ini file, to find your php.ini file, use the guide above for the PHP memory limit.
sudo nano /etc/php/8.2/apache2/php.ini
press ctrl+w and search for output_buffering
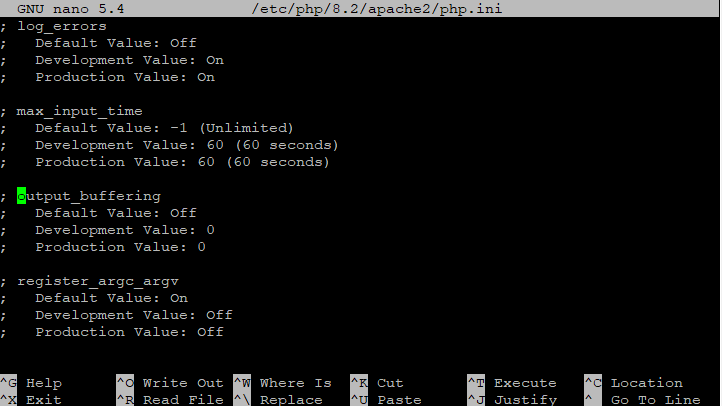
The default value is off but we know the value is in this file somewhere, hold ctrl+w again and hit enter (this will keep searching below this entry)

Now change this value to 0, save and exit nano with ctrl+x, y, enter.
Do the same for the cli, for me that was located at /etc/php/8.2/cli/php.ini but it will be in the same version as before, e.g. 8.2.
Accessing site insecurely via http:
There are many ways to setup a https connection to your Nextcloud server, to use the cloudflare service, see my guide here, cloudfare offers a free option to secure your site using a domain name and a secure tunnel, the best part is that it’s easy to setup.
Cron jobs setup:
It is recommended to use cron jobs to enable nextcloud to perform background tasks, here we will setup a crontab for the web server and configure nextcloud to use cron.
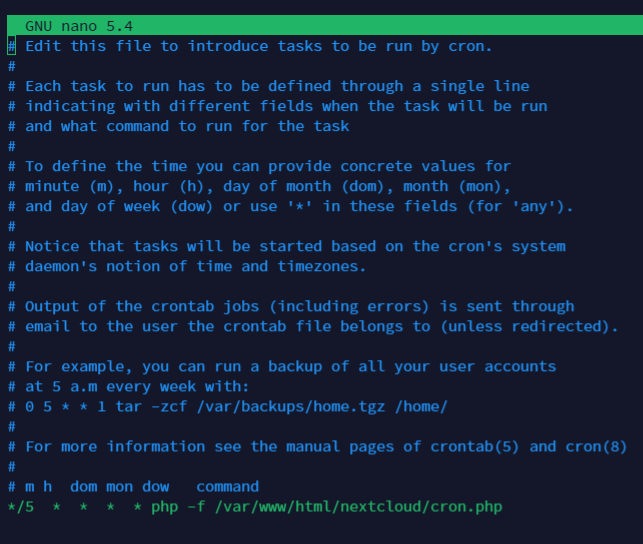
First we will create a crontab for the web server user, in our case ‘www-data’ (a debian system using a LAMP stack) .
sudo crontab -u www-data -e
If asked to select a text editor for cron, ‘nano’ is often the easier editior to learn.
Type the following below the last text entry, be sure the path is replaced with the location of your nextcloud instance:
*/5 * * * * php -f /var/www/html/nextcloud/cron.php
To verify the crontab has been loaded correctly use:
sudo crontab -u www-data -l
This should show the updated crontab as you just edited it.
Now navigate to the address of your nextcloud instance using a web browser and login using an account with admin privileges, click the top right icon and select ‘administration settings’, then on the left select ‘basic settings’.
select cron from the background jobs options, the job will run every 5 minutes, so be sure to let it run before troubleshooting.

Leave a Reply