
In this tutorial, we’ll walk you through the process of installing WordPress on a Debian system, configuring Apache as the web server. Let’s get started!
Step 1: Update the System
Before we begin, let’s ensure that the system is up to date:
sudo apt update && sudo apt upgrade -y
Step 2: Upgrade to PHP 8.2
Check your PHP version, if it is not installed we will do that in the next step anyway:
php –v
Now, upgrade to the latest stable version, in this case PHP 8.2:
sudo apt install -y lsb-release ca-certificates apt-transport-https software-properties-common gnupg2
echo "deb https://packages.sury.org/php/ $(lsb_release -sc) main" | sudo tee /etc/apt/sources.list.d/sury-php.list
sudo wget -O /etc/apt/trusted.gpg.d/php.gpg https://packages.sury.org/php/apt.gpg
sudo apt update
Step 3: Remove Old Versions of PHP and Install PHP Extensions
Remove old PHP versions:
sudo apt remove php php-common php-mysql php-gmp php-curl php-intl php-mbstring php-xmlrpc php-gd php-xml php-cli php-zip libapache2-mod-php
Install PHP extensions:
sudo apt install php php-common php-mysql php-gmp php-curl php-intl php-mbstring php-xmlrpc php-gd php-xml php-cli php-zip
Step 4: Configure PHP for WordPress
Open the PHP configuration file:
sudo nano /etc/php/8.2/apache2/php.ini
Change the following values (you can use ‘ctrl+w’ in nano to search):
max_execution_time = 300
upload_max_filesize = 100M
post_max_size = 128M
Step 5: Install MariaDB
Install MariaDB, a powerful database server:
sudo apt install -y mariadb-server mariadb-client
sudo systemctl start mariadb
sudo systemctl enable mariadb
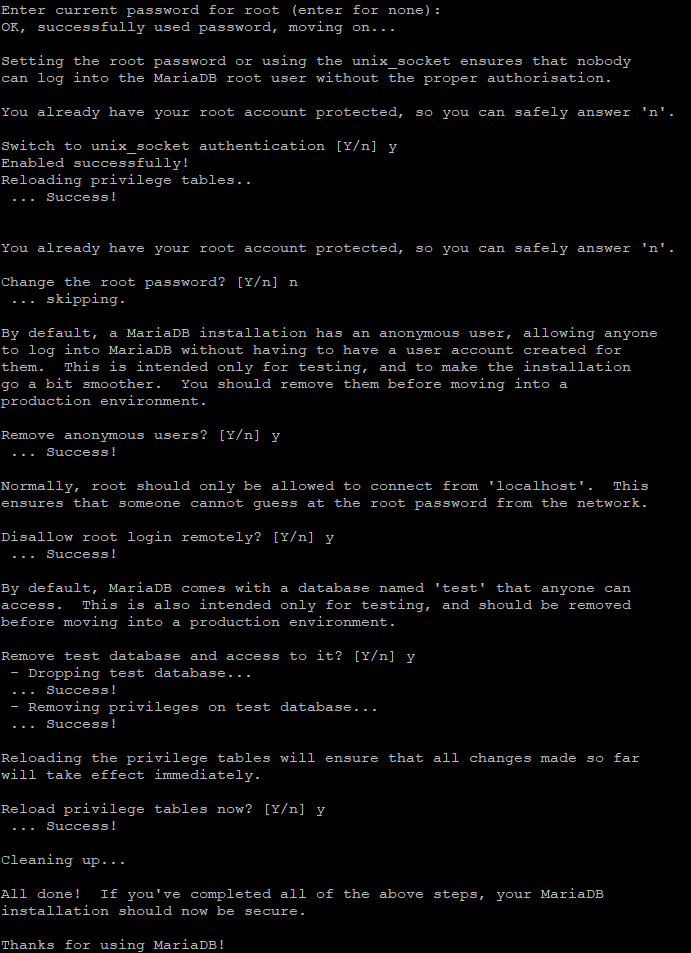
sudo mysql_secure_installation
Follow the interactive prompts to secure your MariaDB installation.
Step 6: Create Databases and Users
Create a database for WordPress and a user with privileges:
sudo mysql -u root -p
In the MySQL shell, run the following commands, being sure to create a unique password:
CREATE DATABASE wordpress;
CREATE USER 'wp_user'@'localhost' IDENTIFIED BY 'Passw0rd';
GRANT ALL ON wordpress.* TO 'wp_user'@'localhost' WITH GRANT OPTION;
FLUSH PRIVILEGES;
EXIT;
Step 7: Download and Configure WordPress
Navigate to the web root directory:
cd /var/www/html/
Download the latest WordPress release:
sudo wget https://wordpress.org/latest.tar.gz
sudo tar -xvzf latest.tar.gz
sudo chown -R www-data:www-data /var/www/html/wordpress/ sudo chmod -R 755 /var/www/html/wordpress/
sudo rm latest.tar.gz
Step 8: Create a Virtual Host File
Create a virtual host configuration file:
sudo nano /etc/apache2/sites-available/wordpress.conf
Add the following configuration, being sure to change servername, serveralias, serveradmin and documentroot if it is different:
<VirtualHost *:80>
ServerName yoursite.com
ServerAlias www.yoursite.com
ServerAdmin [email protected]
DocumentRoot /var/www/html/wordpress
ErrorLog ${APACHE_LOG_DIR}/wordpress_error.log
CustomLog ${APACHE_LOG_DIR}/wordpress_access.log combined
<Directory /var/www/html/wordpress>
Options FollowSymlinks
AllowOverride All
Require all granted
</Directory>
</VirtualHost>
Step 9: Enable the Site and Modules
Enable the site and activate the necessary modules:
sudo a2dissite 000-default.conf
sudo a2ensite wordpress
sudo a2enmod rewrite ssl headers
Restart Apache for the changes to take effect:
sudo systemctl restart apache2
Step 10: Complete WordPress Installation
Open your web browser and navigate to your server’s URL. Follow the WordPress installation wizard:
- Database Name: wordpress
- Username: wp_user
- Password: (the password you set during the database creation)
- Table Prefix: wp_
Once the installation is complete, create a user and a strong password to access the WordPress admin interface. You can do this by navigating to the URL followed by “/wp-admin/”.
Congratulations! You’ve successfully installed WordPress on your Debian server.
Leave a Reply